Your New Healthy Thanksgiving!

Thanksgiving is only ONE WEEK AWAY .. crazy to think how fast this year has been flying by! I've been oogling over all the beautiful recipes out there in the world while working on this year's menu collab with Barre3, the Portland based studio and wellness magazine.

Running With Forks and Barre3 Thanksgiving Classics

The flavors and traditions of this holiday are limitless, heart warming, nostalgic and .. usually, along with your gratitude, you leave you feeling utterly stuffed. Keeping in line with the Barre3 rules of balancing FAT, FIBER and PROTEIN I've created a menu that can help you avoid that feeling, while keep it healthy AND delicious.

If you recall, last year I created the Barre3 DIY Thanksgiving Pies and the Autumn Greens Panzanella Salad and due to them being such a hit on the table last year, we decided to keep them on the spread as a classic along with a few new staples. Mix a few of these new healthy recipes in with your family recipes passed down from generation to generation for a beautiful, timeless and healthy holiday.

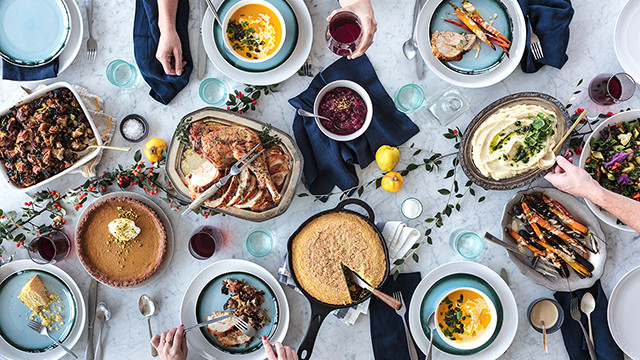
Here is how we set our table this year .. perhaps it will ignite and inspire a bit of your holiday menu planning! 

Running With Forks and Barre3 Autumn Greens Panzanella Salad

Autumn Greens Panzanella Salad – The first thing you’ll notice about this nutrient-rich salad is that it’s absolutely stunning, thanks to the colorful pop of pomegranate seeds and sweet potatoes against the dark leafy greens. The next thing you’ll notice? That it’s absolutely delicious.

Running With Forks and Barre3 Roasted Root Mash

Savory Roasted Root Mash – One taste of this savory, creamy blend of parsnips and celery root, and you may never make mashed potatoes again.

Running With Forks and Barre3 Sausage Kale and Pecan Stuffing

Sausage, Kale + Pecan Stuffing – The sausage, kale, leeks, and onions make this stuffing gloriously hearty, while the pecans and dried cherries round it out with just the right amount of sweetness.  

Running With Forks and Barre3 Skillet Cornbread

B3 Skillet Cornbread – Made with stone ground cornmeal, almond flour and coconut milk, this cornbread is both gluten and dairy free. The slight sweetness of the cornmeal is the perfect complement to Thanksgiving’s savory flavors.

Running With Forks and Barre3 Honey-Orange Cranberry Sauce

Honey-Orange Cranberry Sauce – Cranberries, one orange, and honey. That’s all that goes into this simple cranberry sauce, and yet the perfectly tangy flavor makes it one of the highlights of the meal. It needs to chill for at least six hours, so it’s the ideal make-ahead recipe.

Running With Forks and Barre3 DIY Apple Pie
Running With Forks and Barre3 DIY Chocolate Pie
Running With Forks and Barre3 DIY Pumpkin Pie

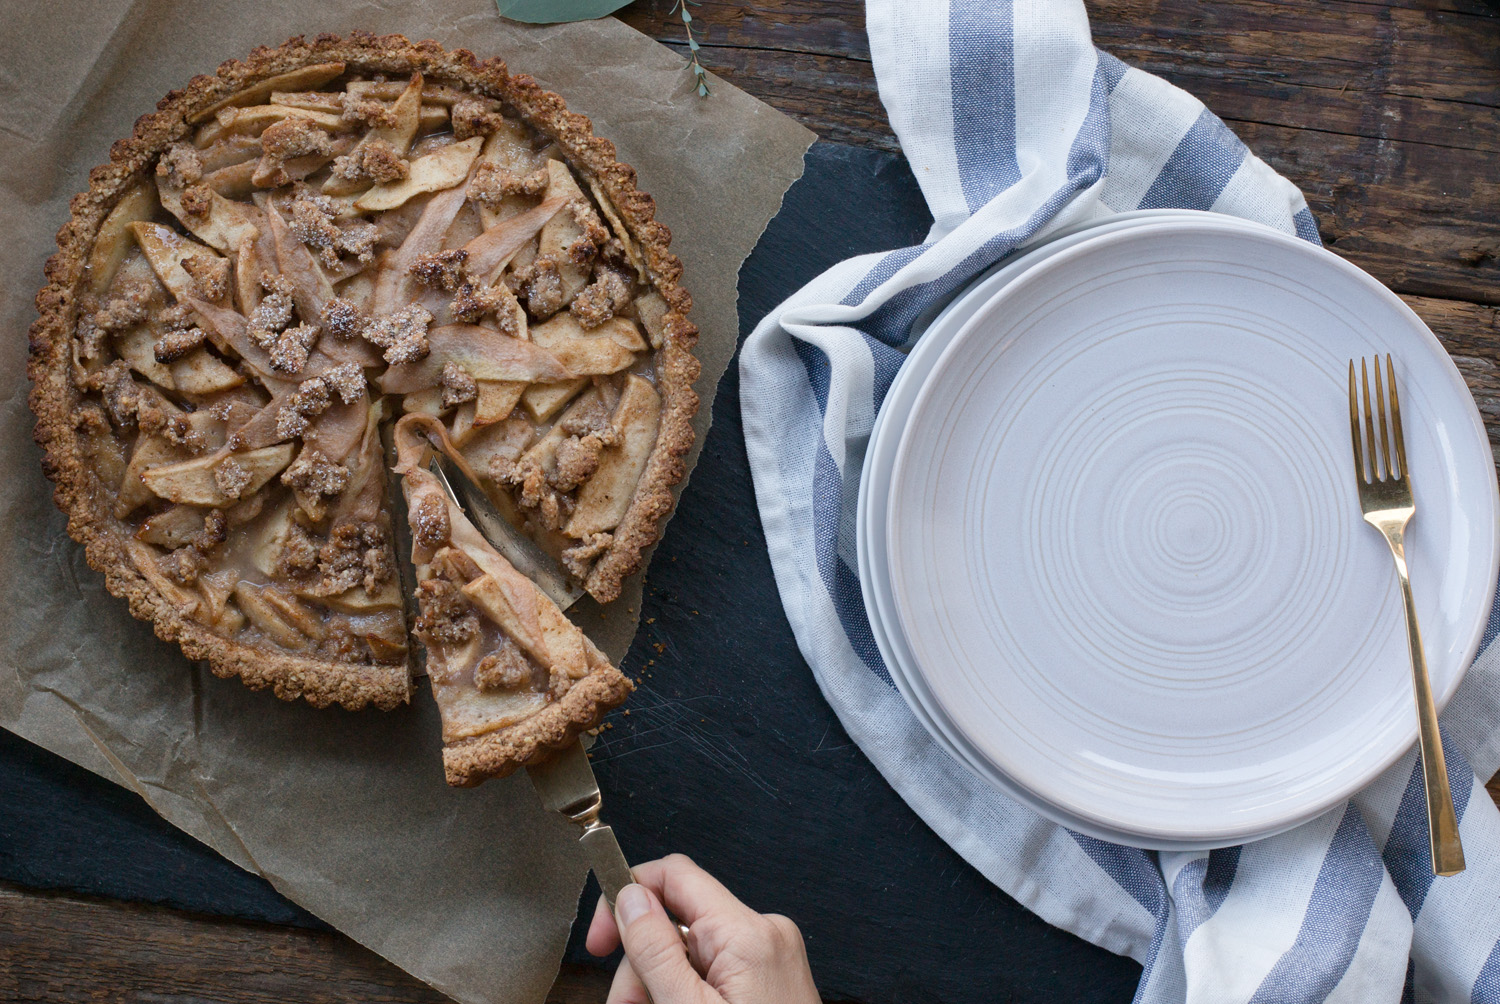
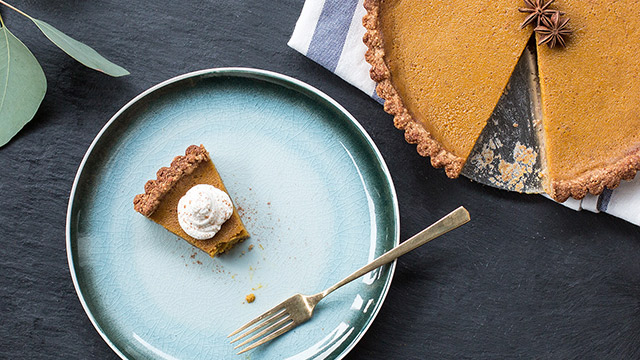
DIY Pumpkin Pie – In the barre3 spirit of Make It Your Own, this recipe is designed so you can choose your own filling. It’s delicious as a traditional pumpkin pie, but the almond-oat crust works just as well with apples, chocolate—you name it! 

The Power of Posture

Running With Forks Yoga and Posture

The most underrated, yet influential, aspect of our health and wellness is our POSTURE.

We all know the mind and body are connected, but it is far more incredible and powerful than we give credit. Not only does posture affect our physical health and function but very importantly, posture affects our mental health and vice versa – think confidence, happiness and the ability to handle emotional and stressful situations. 

Two things to think about: How posture affects our mental state, and how posture affects our physical health and ability to move.

Consider what your posture looks like when you are feeling sad, blue or insecure in a situation. Our body pulls inward towards a fetal, self-protective positioning. Think about your posture during your daily activities – maybe you're sitting here reading this while hunched over your blue-lit screen of choice, slouching with rounded shoulders and a forward head carry, at your desk, in your car or on your phone .. these positions can negatively impact your happiness, your ability to deal with stressful situations, AND how you move and function. 

When we sit or stand with this poor posture, physically, we are compromising our ability to breathe deeply and fully, move properly, and ultimately down the road will lead to micro-trauma, muscular imbalances and injury such as neck, shoulder and lower back pain. Having a strong skeletal and muscular alignment allows the body to function at its best – efficiently, effectively and safely – minimizing the risk of injury and again, vice versa, improving your emotional state. 

Consider what your posture looks like when you are happy, excited and confident in a situation. Shoulders back, chest open, head up, core engaged and feet firmly planted on the ground. When we stand with a powerful posture – even when we don't feel so confident and powerful, there is a positive chemical shift in the brain which will ultimately shift our mood. AND, you guessed it, we can move safely and efficiently.

Through awareness and small adjustments to your routine, you have the power to change your energy and mood as well as your physical appearance, how people perceive you and your resilience to stress, injury and trauma.

For the sake of your physical and mental health, let's get in line. Exercises to promote strong posture coming your way.


Adzuki Bean and Kabocha Squash Stew

Running With Forks and Barre3 Adzuki Bean and Kabocha Squash Stew

Cozy up and enjoy this hearty combination of kabocha squash and adzuki beans in our immune-boosting stew. The squash and carrots are loaded with Vitamin A, while the garlic and onion have flu-fighting properties. This Asian-inspired stew also provides a delicious dose of protein, fiber, iron, magnesium and B vitamins.

Prep Time: 15 mins + overnight soak | Total Time: 75 mins  | Serves: 6

INGREDIENTS:

  • 1 c dried adzuki beans (or red beans), soaked overnight*

  • 2” piece kombu (dried seaweed)

  • 2 Tbsp olive oil

  • 4 garlic cloves, mince

  • 1 red onion, diced

  • 4 celery stalks, diced

  • 3 carrots, diced

  • 1 tsp chili powder

  • 1 tsp sea salt

  • generous pinch red pepper flakes

  • 1 tsp cumin

  • 32 oz can diced tomatoes

  • one-half of a kabocha or butternut squash, diced

  • 1 c mirin (or ½ c rice vinegar and 2 ½ Tbsp honey)

  • 1 c water

  • 2 Tbsp white miso

  • 3 cups baby kale or chopped kale

  • cilantro, for garnish

DIRECTIONS:

  1. Drain water from beans. Place beans in a pot, add kombu and cover with cold water. Cook on high heat and bring to a boil, then reduce to a simmer. Crack the lid and leave beans to cook until tender, up to one hour. (* Alternatively, you can use 2 cans of adzuki beans or any white or red bean available an your local market and start at step 2.)

  2. While beans cook, in a large dutch oven or soup pot, combine oil, garlic, onion and chili powder over medium high heat. Add a pinch of salt, red pepper flakes and cumin and sauté until translucent, 8-10 minutes. Add carrots and celery and cook another 10 minutes.

  3. Add diced tomatoes, squash, mirin (or vinegar/honey) and 1 cup of water. Bring to a boil, cover and reduce heat to low. Cook until squash is tender, about 35 minutes. Once tender, remove a small amount of liquid and dilute miso and add back to stew. Add cooked beans and simmer until flavors meld together.

  4. Remove from heat, add kale and stir to combine until wilted.

  5. Garnish with cilantro.

Push-Up Perfection

Running With Forks Pushup Perfection

Push-ups might seem like an incredibly simple exercise, but there is SO much more to it than simply bending your elbows and pushing yourself away from the floor.  And if you've never been able to do one or never learned how to do a proper push-up, these tips can help you get on your way to building the strength you need to complete your first one or simply perfect form. I use push-ups not only to build upper body strength, but to increase trunk stability, correct muscular imbalances and teach the body how to work as one unit. 

If you've worked with me before, you know I'm a stickler for proper form and technique in order to prevent injury and help you get the most out of your effort.

(Modifications: To decrease the intensity, perform push-ups on an incline with your hands on a stable platform (bench, table, sofa, etc). Elevate your body to a degree that allows you to perform with excellent form and decrease the angle as you get stronger, working closer to the floor.)

ALIGNMENT! is KEY to performing a safe and effective push-up

STARTING POSITION - PLANK

Upper body: Place your hands slightly wider than shoulder distance apart with your index fingers parallel to each other and align your shoulders with your wrists. As you press your hands into the floor, draw your shoulders away from your ears and down your back and visualize spinning the hands away from your torso to engage the lats and serratus anterior. This action will help you stabilize and maintain a strong upper body throughout the movement. 

Spinal Alignment: Maintain a neutral head position so your body forms a straight line from the back of your head all the way to your heels. (It can be helpful to visualize a broomstick along the backside of your body - in contact with your head, upper back, hips and heels). 

Focal Point: Pick a spot about one foot in front of your hands and maintain that focal point throughout the movement to help maintain the proper spinal alignment.

Core/Lower Body: Draw your navel up towards your spine to engage the abdominals; draw your bottom ribs and frontal hip points towards each other to fully engage the anterior core muscles; press your thighs towards the ceiling to engage the quadriceps; squeeze your glutes to help neutralize the pelvis and minimize stress to the spine; squeeze your inner thighs and ankles together to assist in engaging the entire lower body and core.

YEW! That's a lot to think about and we haven't even moved! 

BREATHWORK

Your breath is so so so important as you perform this exercise (any exercise for that matter!), giving you more power and stability for each repetition. As you sit here and read this, give this a try - take a deep breath in and exhale ALL of your air out until you feel empty. Notice how the core fully engages. 

When to breathe: INHALE as you lower your body towards the ground and EXHALE on the effort of pushing yourself back up to the starting position.

NOW THE PUSH-UP (THINK OF IT AS A MOVING PLANK!)

As you inhale, visualize slowly lowering your chest towards the floor, maintaining the alignment from your plank position. Elbows should be angled and pointed back to 45 degrees rather than directly out to the side. Use the strength of your legs and core to resist gravity and slow you down as you lower. Do not let your muscles relax. Pause when you find your edge that you can hold for a second and maintain alignment.

As you exhale, visualize lifting your body back up in a straight line as one solid unit, lifting your navel towards your spine. This movement should feel like a total body exercise, not only a chest and upper body exercise. If you lost ANY of your alignment lowering or coming back up, decrease the distance that you lower until you find you can maintain excellent form throughout. 

REMINDER ONCE AGAIN - if this feels too challenging or you cannot maintain proper alignment, elevate your push-up to an incline and perform as described above. As you increase your strength, decrease the angle of your incline to move closer to the floor. 

NO GO GET 'EM! Let me know if you have ANY questions - so happy to answer and help you perfect this universally amazing exercise.

Cheers! KM

The only frittata recipe you'll ever need

Running With Forks Frittata

One pan, easy and fast, and packed with a bounty of nutrition. Frittatas are my go-to for eggs when I'm entertaining friends and also one of the easiest things for having healthy breakfast on hand in the morning. Make it on a Sunday and have a delicious go-to Monday, Tuesday and Wednesday – unless you have a giant family an big eaters and it might not even make it off the table – so worth it, regardless. These one pan winners are packed with protein and veg and ideal for using up any leftovers you might have in the fridge.

Master the basics and then get creative.  Here are my frittata rules:

  • 1 dozen eggs : 1/2 c dairy

  • well-seasoned 8-10 in cast iron skillet for a dozen eggs or more (less eggs for this size will result in a thin, dry frittata)

  • well cook all ingredients first

  • 350 degrees, 20-30 min

Here I made my favorite spring herb frittata.  We are starting to see more and more nutritious green vegetables which makes me want to put them in everything. And that's what I did here.

SPRING HERB FRITTATA

Prep Time: 10 mins | Total Time: 40 mins | Serves: 6-8 

Ingredients:

  • 12 farm eggs

  • ½ c coconut milk (or heavy cream if ok with dairy)

  • 1-2 Tbsp olive oil

  • 1 medium leek, halved and thinly sliced

  • 1 medium zucchini, halved and thinly sliced

  • 2 cups shiitake mushrooms, thinly sliced

  • 12 stalks asparagus, 1 inch pieces

  • 3-4 Tbsp chopped parsley

  • 2-3 Tbsp dill, chopped

  • 2 Tbsp chives, thinly sliced

  • ¾ c shredded fontina or dairy-free cheese such as daiya

  • Salt and Pepper

 Directions:

  1. Preheat oven to 350 degrees.

  2. Heat a cast iron skillet or deep sauté pan or over medium high heat. Once hot, add leeks and a small pinch of sea salt and sauté until softened. Add mushrooms in a single layer and brown on each side. Once mushrooms are cooked through, add zucchini, asparagus and a small pinch of sea salt to season and cook until just softened.

  3. Meanwhile, in a large bowl, whisk eggs, milk, parsley, dill and chives. Stir ½ c cheese into egg/herb mixture and season with sea salt and fresh cracked pepper.

  4. Pour egg/herb mixture over sautéed vegetables, shaking pan to distribute (do not stir) and sauté for 5 minutes until edges are just set. Sprinkle ¼ c shredded cheese over the eggs and place in oven for 20-30 minutes or until beginning to brown on top.

  5. Remove from oven, let cook slightly and top with fresh spring herbs to serve.